Native graphite from Chardonnet in Haute-Savoie, France, given by Mr Gaultier of Chambéry. Gallery of Mineralogy of the Muséum National d’Histoire Naturelle in Paris.
by
Jastrom (Marie-Lan Nguyen)
Following on paper recommendations for Bargue’s course, here’s a follow-up on pencils & cie. You may also enjoy the following series:
- On Bargue's drawing course: introduction (1/3)
- On Bargue's drawing course: a holistic teaching (2/3)
- On Bargue's drawing course: going further, drawing 'gong-fu' (3/3)
Short answer: Bargue plates are often copied religiously
rigorously, and they most often present a smooth rendering. This
is conveniently achieved with graphite; more precisely:
- graphite pencils (most renowned brands should do):
- 2H: you can get away without this one, but still a good option;
- HB: main one (workhorse);
- 2B: necessary to get deeper dark than what one can achieve with a HB;
- 4B: to get the darkest tones; depending on the paper, similar dark tones could be achieved with a 2B, but at a slower pace, although often with a (slightly) reduced grain.
- utility knife and sandpaper, to sharpen the pencils to a fine tip;
- kneaded erasers (workhorse);
- a regular eraser can be useful; Tombow’s Mono eraser (2.3mm) are a great option;
- avoid blending stumps;
- avoid charcoal (in any form: vine, pencil, etc.) or related material (e.g. carbon pencil).
Bear in mind that such a list of material is useless on its own: you can’t make a cake from a list of ingredients, you need a recipe, which I’m going to introduce you to next. But first, as the process for doing accurate Bargue plates copies is rather slow, I’d like to provide you with the following:
How that diligence [accuracy] should first be learnt rather than rapid execution.
If you, who draw, desire to study well and to good purpose, always go slowly to work in your drawing; and discriminate in the lights, which have the highest degree of brightness, and to what extent and likewise in the shadows, which are those that are darker than the others and in what way they intermingle; then their masses and the relative proportions of one to the other.
And note in their outlines, which way they tend; and which part of the lines is curved to one side or the other, and where they are more or less conspicuous and consequently broad or fine; and finally, that your light and shade blend without strokes and borders [but] looking like smoke.
And when you have thus schooled your hand and your judgment by such diligence, you will acquire rapidity before you are aware.
– Leonardo Da Vinci (Notebooks, Chapter IX - The Practice of Painting)
Graphite
Pros
- easily controllable: a key point for beginners, you definitely want that. Bargue’s plates are subtle and delicate, it’ll be difficult enough to get something good with graphite, don’t make it harder on yourself than need be by using something else, at least for your first handful of plates;
- cheap, and you probably already own a few graphite pencils;
- durable, permanent: the drawing should easily hold at least for decades assuming you’ve got good quality paper, decent framing, etc.;
- available everywhere: some other mediums can be difficult to find locally / not easy to order online from everywhere;
- doesn’t stain the paper, by comparison with other mediums (e.g. sanguine) and unless for very soft lead applied grossly: we won’t use very soft lead, and the technique later described require a fine application. I furthermore advise a two papers approach, which helps get rid of the issue.
Cons
- some amount of shine: it can be reduced in two ways:
- avoid burnishing the graphite (make sure your pencil tip is always needle-sharp, and exert no pressure, just lightly brush the pencil tip on the paper);
- some papers with noticeable “free” fibers absorb light more efficiently. There are other pencils1 which may help bring this even further but I wouldn’t bother, at least for a beginner: mastering technique is more important;
- limited value range: it’s harder to get dark values, or at least, slower than with other dry mediums;
- slow technique, which per the previous quote, might be more a blessing than a curse, but beginners might feel otherwise.
Hardness
The lead of graphite pencils is made by mixing graphite, an abundant, naturally occurring mineral, with clay.
The more clay, the harder the lead, the longer a finely sharpen tip
holds, the lighter the tone/value.
The more graphite, the softer the lead,
the faster a finely sharpen tip gets dull, the darker the tone/value.
There’s furthermore a difference in terms of particle size between clay and graphite: a consequence is that softer lead (graphite-heavier lead) will tend to reveal the grain of the paper (the microscopic hills and valleys) more than harder lead (more on that in a moment).
A key aspect of the technique presented below, which but perhaps for some minute details seems to be the standard approach modern approach for fine graphite rendering, is in controlling the amount of texture.
Note: Low quality pencils can contain gritty bits (very hard bits of material that can scratch the paper if you’re not careful). That’s an issue I’ve had with e.g. Caran d’Ache graphite pencils (perhaps a bad batch), which is one of the most expensive brand out there. No problem (so far) with neither Staedler nor Faber Castell.
Tip: 2mm clutch pencils are great tools, especially if you want to draw on the road (e.g. museums).
For the curious minds:
Sharpening
Set aside your school sharpener : there are inefficient/wasteful/limited.
I’ll explain why in the next section, but for now, you’ll want all your pencils to be sharpened to a fine tip: remove some of the wood with an utility knife, and use sandpaper to bring to lead to a needle-like tip. For clutch pencils, just sand the lead.
Tip: Wipe of the graphite powder from the lead with some paper towel after you’re done sharpening. It may end up on the paper otherwise, or simply messes up with your first few strokes
As you use the pencils, the tip will naturally worn. Some artists will turn the pencil regularly to keep a fine point for as long as possible. That’s a bit demanding: sanding it lightly from time to time is sufficient in my experience.
Note: As already mentioned, softer lead (2B, 4B) will lose their tips faster than harder lead (HB, 2H).
Some artists prepare multiple pencils of the same hardness. Some others are very peculiar regarding the sharpening. As far as I’m concerned, a reasonably fine tip does the job; I use the variation of texture to know if the pencils are sharp enough.
Erasers
Kneaded erasers
Erasers just aren’t for fixing errors: they are an essential part of the drawing process. To the point that for instance with charcoal, you can use a kneaded erasers to grab some excess of matter at some spot, and move it in a place where you need subtle values.
Anyway, kneaded erasers should be your workhorse erasers for fine graphite drawing. You can use them:
- For corrections, obviously;
- For precise “proportion corrections”: you can shape the eraser finely, thus giving you a great deal of finesse regarding what you want to erase
- For precise value adjustments, for instance, lightening areas with a great deal of control.
There are other things you can do with them, but the previous points should be all you need to copy Bargue plates.
Tip: There’s some oil on the skin of your fingers. Overtime, if you manipulate the eraser a lot, the eraser can absorb some of it, and unfortunately restitute it to the paper, which can cause annoying, un-erasable marks. Washing your hands with soap before drawing is a great habit.
Tip: For similar reasons, avoid touching the paper with your hands too much. If you need/want to use your pinkie on the paper, you can for instance use an old socks as an ad-hock partial glove between your finger(s) and the paper.2
Regular erasers
Regular erasers can be used too, but they may not all be as precise. You can cut pieces to get sharp edges/tips, or use the famous Tombow mono erasers.
Technique
Introduction
As already explained, graphite pencil’s lead is composed mainly of, well, graphite, and clay: comparatively more clay implies harder lead with lighter value, and comparatively less clay implies softer lead with darker values.
Clay and graphite are made out of particles of considerably different size: the clay particle are much finer. Why does this matter? Because the paper surface is full or small “hills and valleys”, more precisely, of an intricate, chaotic network of fibers:
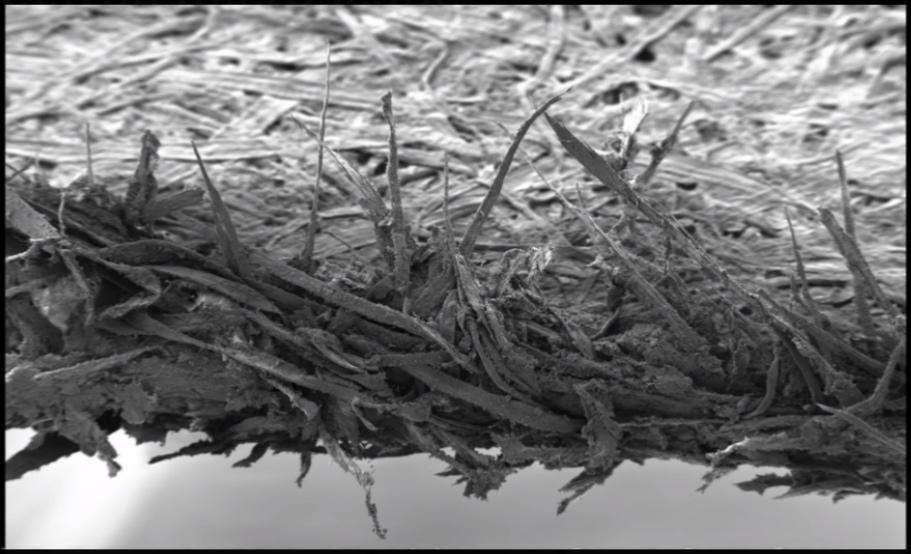
Electron microscope view of the edge of a sheet of paper through reddit.com
Finer particles accumulate nicely on all the surface: visually, the result is smooth. Coarser particles don’t penetrate as much: visually, they generate a noticeable texture.
I suppose a good analogy would be to consider the same irregular surface that you try to cover with either sand (hard lead) or small pebbles.
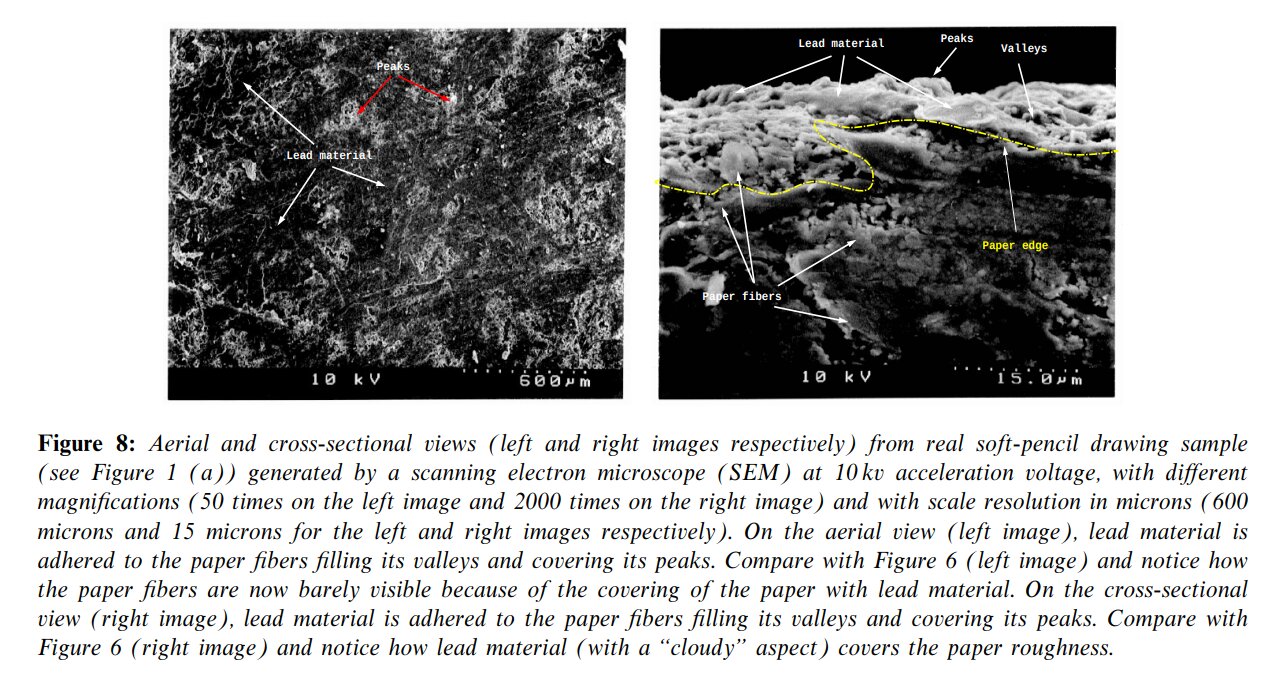
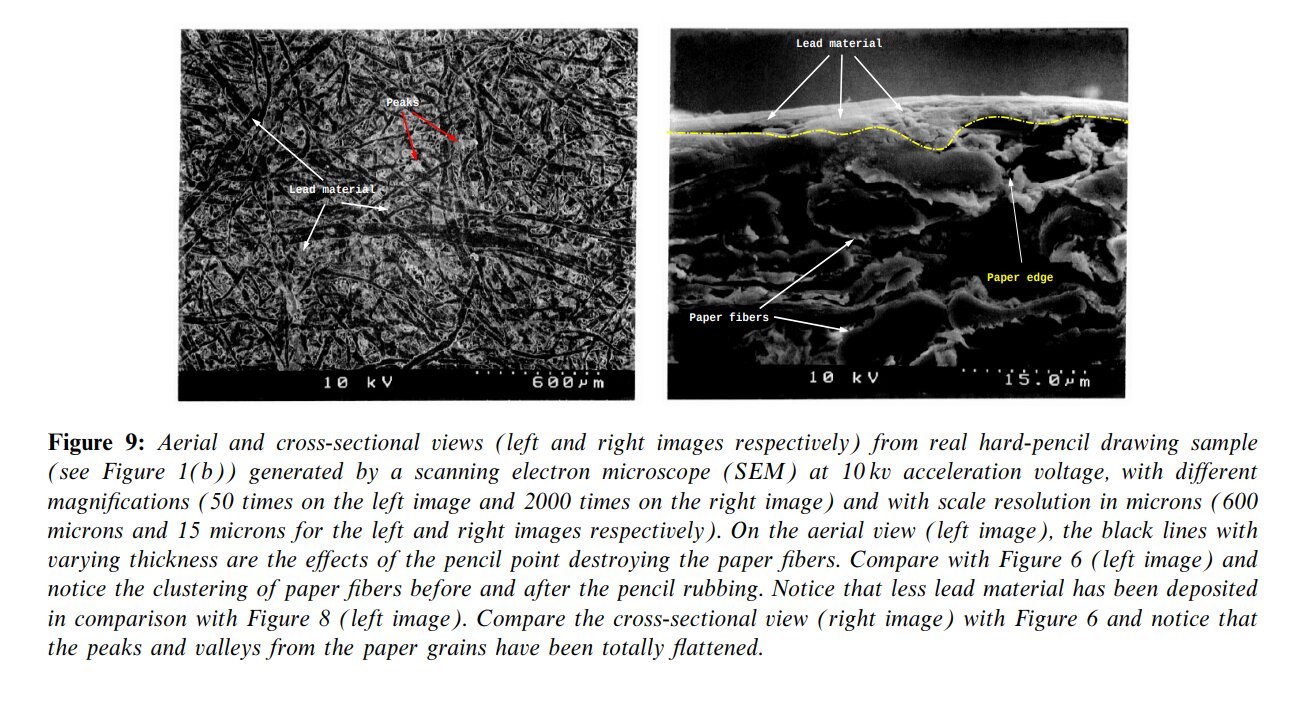
The following three images are taken from a research paper by Mario Costa Sousa and John W. Buchanan, who studied the (microscopic) behavior of graphite on paper so as to create computer models attempting to replicate pencil marks digitally.3
Raw paper (no graphite)
by
Mario Costa Sousa and John W. Buchanan
through
wiley.com
Soft graphite lead on paper
by
Mario Costa Sousa and John W. Buchanan
through
wiley.com
Hard graphite lead on paper
by
Mario Costa Sousa and John W. Buchanan
through
wiley.com

Texture control
As stated earlier, a key aspect of this technique is to control the texture. The first step is to learn how to make it as negligible as possible, as demonstrated in simpler plates (the texture you see here, the vertical lines, is the paper’s texture, likely an Ingres paper; note how flat and regular the shadows areas are: that’s what you want to focus on at first):

Plate I 5, Profile of a foot, cropped
by
Charles Bargue
Note: Observe how effortlessly one can develop such flat dark areas with oils, by comparison with graphite.
To achieve this, usually what you’ll want to do is to work in layers, starting with hard graphite to even the surface of the paper:
- make a first layer of strokes, all parallel, going in the same direction (remember to keep a sharp tip); mind the amount of gap between the lines (you’ll want it to be small to inexistent);
- then, make a second layer of strokes in a similar fashion, but for instance at a slightly different angle.
Two layers should be enough to remove the hatching texture induced by the first layer. You can then build up darker values by repeating the process, eventually progressively switching to softer leads as you go darker. The reason your lead should have a fine tip is because you want to layer graphite as deep as possible in the valleys of your surface, for otherwise, with a coarser tip, the lead wouldn’t be able to reach as deep.
Your touch should be gentle: brush the tip of your pencil on the surface, with no pressure. This will help:
- to avoid damaging the surface of the paper too much and imposing too noticeable of an extra texture;
- and also to reduce the amount of “burnishing”: if you already have graphite on the surface, by using too much force, you’ll burnish the existing graphite, increasing the shine.
Practically speaking,
- You can use the HB pencil as a base for most values; it shouldn’t bring too much texture, and provides a good base for darker values.
- For lightest values, layer some 2H. Alternatively, use some HB, and lighten it with a kneaded eraser. For extremely subtle values, you may need to use the kneaded eraser over the 2H;
- For darker values, start by layering 2/3 coats of HB, and then build up layers of 2B. You can use the 2H to help “break” texture introduced by softer lead if needs be. And eventually switch to a 4B or more if that’s not dark enough.
Once you’ve mastered the flat/uniform surfaces, you’ll want to learn how to selectively add/use this texture to your advantage, as demonstrated in most advanced plates of the course:

Plate I 55, Belvedere torso, rear view
by
Charles Bargue
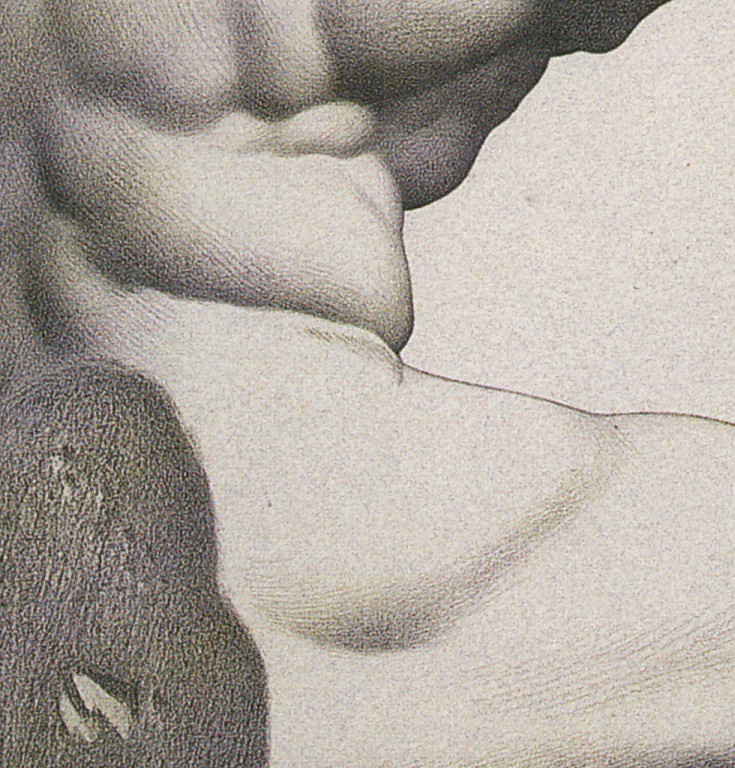
Plate I 55, Belvedere torso, rear view, close up view
by
Charles Bargue
Exercises
This might feel a bit daunting, but it quickly becomes second nature. A good exercise to get you started it to work on small swatches of flat, uniform values. you’ll want to spend enough time until you’re comfortable with this before moving on to Bargue plates4.
Exercise: Make 2 small swatches: one with the lightest noticeable value you can achieve, and one with the darkest value you can achieve. The swatches must be perfectly uniform and smooth. You can perform each swatch with either a single pencil, or with multiple pencils, and repeat the exercise to experiment with different combinations. It’s interesting to get an idea of what you can achieve with a single pencil, and get a feel for how much variability there are between all the options.
Exercise: Make a 5 value scales, keeping them as evenly separated as possible. Keeping them evenly separated is a noticeably difficult part of this exercise. Take your time: for a beginner, it’s not unreasonable to spend a few hours on this (say, with 2cm×2cm squares). Again, you should be getting somewhat faster with experience.
Blending stump?
Blending stumps are best avoided by beginners. The main issue is that blending stumps are a (literally) coarse tool:
- proportion-wise: their tips are big, and almost impossible to be made (and kept) fine;
- value-wise: they can’t reach the ease of of value control provided by graphite/kneaded erasers.
Some artists do use them for fine drawings, but for very narrow purposes, such as helping to break texture for the first layers of graphite.
Tip: Q-tips are a nice alternative to blending stumps. You may want to experiment with both.
Charcoal?
Charcoal has a few advantages over graphite:
- it’s matt;
- it can go darker, quicker.
But it’s harder to control:
- the process is more subtractive: start by applying charcoal, then use a kneaded eraser to bring it to lighter values. A “dirty” kneaded eraser, that is, a kneaded eraser loaded with some amount of charcoal where you intend to use it for “erasing”, will remove less charcoal from the paper, thus allowing you to get finer value control; you can also use stumps, chamois cloth, etc. to remove smaller amounts of charcoal
- for darkest values, you’ll want to work the charcoal in the fibers of the papers, (or work in layers with a fixative spray, but this’ll prevent you from fixing mistakes).
- vine charcoal will fly off the paper very easily, and wears down quickly (hard to kept to a fine tip);
- while compressed charcoal (chunks and charcoal pencils) will stick more, be easier to kept fine, but tend to stain the paper.
For fine art, Nitram charcoals are often recommended, as they offer a nice balance between compressed charcoal and vine charcoal (they are harder, and thus better suited for sharpening and fine rendering).
All in all, for beginners, this may be more difficult than using graphite, which is slower, but more “regular”, which is why I’d recommend to master graphite first. Then, perhaps, try charcoal.
Oils?
Some people recommend charcoal as an intermediate step before moving on to oils: if you want to use charcoal as such, perhaps working with oils directly is a wiser choice. Stick to monochromes (black and white, or “brown” and white), work in stages as already advised: make a first drawing on a draft surface with graphite/charcoal, then transfer it to a surface suitable for oil5.
You can also try drawing directly with oil:
- preferably, use a PBr7 (raw umber/raw sienna/burnt sienna/burnt umber , PBr7 (artiscreation.com), PBr7 (handprint.com)) based paint: it’s cheap, durable, available, and contains manganese, which speeds up the “drying” of oil: you’ll have a touch-dry surface in a day (you do want fast “drying” lower-layers for oils);
- use this to perform an underdrawing, essentially to block all your proportions;
- depending on your approach, you can then either work directly in one pass, or make a few other pass to cover the underdrawing.
Tip: Don’t let yourself be impressed by oils: it must be the most controllable drawing/painting medium out there. It can be highly technical, but basic usage doesn’t require advanced technicalities. Its main issue is that it requires a bit of extra setup/tear down time, and a careful brushes handling.
Toned paper + white?
That’s a bit unorthodox for Bargue plates, but that’s definitely an option you can try. The white you’ll get will generally be made from a combination of
- PW25 (gypsum/gesso , PW25 (artiscreation.com)) / PW26 (talc , PW26 (artiscreation.com));
- PW4 (zinc white/Chinese white , PW4 (artiscreation.com), PW4 (handprint.com));
- PW6 (titanium white , PW6 (artiscreation.com), PW6 (handprint.com)).
It tend to be coarser than graphite, so you may want to use a blending stump to help spread it evenly, and a kneaded eraser to subtractively control the values, as previously described for graphite and charcoal.
Note: Whites never feel white enough. The most opaque solutions must be pure PW6 (titanium white , PW6 (artiscreation.com), PW6 (handprint.com)) white pastels, but sometimes, very subtle minute amount of whites are enough to make the drawing pop, especially when you’re using a rather dark toned paper.
-
There are some matt graphite pencils by Faber-Castell, but I haven’t used them yet for fine drawings. ↩︎
-
Or pay ~20€ for a fancy artist-version of the old sock at your local art-store. ↩︎
-
I guess for use in drawing software and others. ↩︎
-
I mean, don’t hesitate to spend 1h on a small 2×2cm swatch if need be when you’re learning. You should get more efficient with practice, but the process is slow. ↩︎
-
This can be as simple and cheap as some relatively thick paper with 2 coats of white acrylic gesso. There are more involved options, but that’ll give you a good start. ↩︎
Comments
By email, at mathieu.bivert chez: